TL;DR.
Creating an online course is both a tedious yet incredibly rewarding process! The process from start to finish can be intimidating. That’s why Maven Edu created the ultimate guide of 11 total steps to successfully create an online course. We give you our step-by-step process to creating our courses, real tools that we utilize, real examples from our own course documents, and some freebies! Get the tools you need to succeed and jump in!
Introduction.
While our process is constantly changing, certain parts are incredibly detailed while some are more loose and creative. This post will take out the details and the process points that have evolved and focus primarily on the core steps that you need to take to develop your online course. Our recommendation is that you take these steps and develop your detailed course design process from there.
The process you ultimately develop will be your own based on:
- Your target audience(s)
- Your course presentation requirements
- The platform you are hosting on
- Your own personal goals
- Your business goals (if applicable)
- The course delivery format
- Your writing process
- Your filming process
- Marketing Plans
- Technology requirements/restraints
- And so much more
Our goal when developing our course design process is to create a step-by-step guide to develop our courses so that we can create our courses in a similar and familiar format, ensure we don’t miss any important steps, and to have a trackable process to ensure development timelines.
So take all of these items into consideration while reading our design process to create your own detailed course design process.
Without further ado… let’s jump in!
Course Design Process
1. Choosing the Course Topic
The first and most important step is to identify the topic. This seems like a “duh of course” moment in the design process, but it’s the most important foundation step that will drive the remaining process. The course topic must be something that you are deeply passionate and knowledgeable about. Your students are coming to your course to learn the topic from a professional.
Utilize all of your skills, talents, and life experiences to create the course! Real-world examples and experience is infinitely valuable to students and humans alike. We like to relate through experiences. This doesn’t mean that you need to have a PhD in teaching to make a great online course!
In short you need to consider the following in developing your course idea…
Passion ? + Experience ⏲ + Skills ? + Audience ? = Course Idea ✅
At Maven Edu we utilize our incredibly talented networks to search for potential instructors. Because we are a business making and developing courses sometimes we switch steps 1 and 2. If we know of a hot course topic we will often search for a respective professional to develop the course with us.
2. Researching Market Demand
This step can be the most frustrating, disappointing, supportive, or validating. The point of this step is to prevent you from wasting your time in developing and creating a course that has no market interest from potential paying customers. This can be disappointing when you really have the passion, the experience, and the skills but no audience who are interested. NOW, let me say that this does not in any way mean that you won’t have an unsuccessful course or topic on your hands. The market is always changing, interests change, and things come into style and out of style. Overall you have to be sure that your course topic would be valuable to the audience.
So how can you figure out market demand? We first have to ask ourselves some questions:
- What are people talking about? What questions are they asking?
- What courses/information are already available online? What is the quality?
- What is the current popularity on the topic?
- Will someone be willing to buy your course to solve the problem they are facing or learn the topic you are teaching?
Let’s break each of these four questions out and determine our market demand. For this step and the remaining steps, I will use our Maven Edu Course Quit Wasting Time as the example.
What Questions are People Asking?
Use your internet sleuth skills (and some free online tools)! These tools are just some simple and basic free tools available. If you are really looking to gain in-depth information you can utilize lots of paid resources based on your specific topic. For example, if you are trying to gain the edge on an upcoming business topic or technology topic you could utilize Gartner research trends. This all depends on how detailed and in-depth you need to be.
Google Trends
Google Trends is a great resource to see what people are looking for online. Try different variations of your course topic and try wording it in the terms you would use if you were looking for a similar course or resource. For our example we searched for time management trends.

We can see that while the topic is currently downward trending over the past year, let’s look at the trend for the past five years.

In this chart we can see that the term trends sideways. Now there isn’t a rhyme or reason for this necessarily, or not one that you want to spend the time to figure out, but we can see that interest in the topic is cyclical. This can be a good sign for a course that will be valuable for many years to come!
Google Keyword Planner
Google Keyword Planner is a free tools available through Google Ads. Again, enter the same terms you used before or find new terms and see what the average monthly searches are. These are real Google searches that people are looking for. This is an important exercise for later with the marketing of your course. These are potential search terms that people can use to find your course. Consider all search terms, both high/medium/low competition, for this exercise since we are just validating interest in the topic.

There’s quite a bit of information in this screenshot. We can see that the average searches are anywhere from 100-1K per month searches for “time management course” but there is more of a demand in “time management skills.” This can be how you market your course towards what people are searching for.
Online Discussion Boards
Reddit, Quora, Answer the Public, Facebook Groups, or other professional groups are great areas of resource to validate your topic. These are real people that are discussing your potential topic. You can even post in these boards asking interest questions, maybe promote your course after it’s completed, and much more!
What Other Courses are Already Available?
While determining interest is important, you should also search for your competition. Topics such as “Photography” are incredibly saturated and there are a ton of courses out there, both paid and free. You need to determine how your course will stand out from the rest. Answer these questions to try and gather ideas to differentiate yourself from the competition:
- What are students going to get from your course that they won’t get or can’t get from other courses?
- What audiences are the competition targeting?
- How can you appeal to a different audience?
- How can you cover the topic differently?
What is the Topic Popularity?
Ultimately, the previous activities should answer this question for you. But let’s just ask it in a simpler way… Is the topic hot right now? As of this blog in February 2022 hot topics like Crypto, NFTs, and Blockchain are on fire right now. These could be opportunities for you to learn and become an expert in that topic area. Keep your ear to the ground on popular topics that are being discussed on the news and social media to prompt a course idea. This could be based on what you already know and what you can already teach or it could be something you are into learning and potentially teach at a later time.
Will Someone Buy Your Course?
This is a hard question to answer. It’s an important question to ask when performing research. There are a few ways you can approach this question:
- Preselling Your Course – In short, preselling courses happen all the time. You can sell the course idea before you make it to see if there is an interest.
- Competition – You can look at similar courses online through Udemy, Coursera, and more to see what those courses are priced at.
- Talking to Your Audience – Use the information from Online Discussion Boards to your advantage and ask people what they would potentially pay for your information.
So take these topics, research them, and see which one(s) you want to work with.
3. Pricing Research
Pricing is incredibly difficult to nail down. There will always be second… third or even fourth guesses on if you priced your course appropriately. While I cannot tell you a magic formula or method to price your course, I can tell you how Maven Edu has approached the question.
There are two main types of pricing methods that we previously mentioned: low volume and high volume.
Low volume pricing means that you want to price the course higher which will sell less copies of the course but each sale will bring in a lot of money.
High volume pricing means that you want to price the course lower which will sell more copies of the course but each sale will bring in less money.
Lots of companies use this method. Take Tesla for example. Tesla used this method to build their business. Low volume/high price (Model S), then moderate volume/moderate price (Model Y), and finally high volume/low price (Model 3).
There is of course the middle ground of moderate volume. Most of you won’t be on either extremes of the polar pricing methods that we mentioned. So you ultimately need to decide where you want to land in the middle ground. Base this on the popularity and interest of the course but also what you are going to offer in the course. What is the value?
If you are just talking on a screen, the information could be valuable, but it’s less enticing. But what if you are providing free custom tools, worksheets, documents, partnered free trials, or more? This could make the course more valuable by providing these items. Instead of creating the items themselves, students are paying a premium to get them from you.
So, decide how much value you want to provide in the course and price it appropriately. This also doesn’t mean you can’t adjust the price over time! So start with something and adjust as necessary.
4. Determine Course Format
Your course format will ultimately dictate the remaining steps inside and out. So it’s very important that you decide your course format intentionally. There are some things you should consider in this process like, your hosting platform, the course material itself, your intended audience, and more.
At Maven Edu, we opt for the video courses with our instructors in front of the cameras. There are some cases where we would opt for a different format however. We personally like the engagement with the camera option, but it also give our students the opportunity to listen to the audio only if they close their phone screen off. This is something that our own platform can provide.
Sometimes you might want to just have an audio only version based on the course content, especially if your budget cannot contain the video expenses. You could maybe opt for a screen recording version with a web cam. Another option could be a text only option. For an online course, we need to keep the audience engaged to learn! We wouldn’t recommend a text only course but use the text to aide and contribute to the other media you have in use. But if it’s the best delivery format for your course, go for it!
In this step you can also begin to draft a list of other components you might need to create or develop for the course based on the platform itself. We will ultimately mature and use this list in step 7.
5. Curriculum Development
Ahhh the curriculum… the core of the course! This step is the best step, the worst step, the most annoying step, but also the most satisfying step. At Maven Edu, we created and utilize a curriculum template with each and every course. The curriculum template is the ultimate resource for the course we are developing. It is personally designed for Maven Edu with our course structure, it asks for details/questions that need to be answered, it helps us ensure that we have all the proper LMS information defined, and is utilized to help with the script development in step 6.

Once completed, our curriculum allows us to quickly and efficiently fill out all of the information we need for the website, the LMS, social media materials, and so much more. So if you are writing your first course, take note of the process you are taking and create a curriculum template for when you write your next course! Definitely use the structure that we use in our curriculum template, seen above.
Curriculum Draft
So what should you consider when writing your curriculum? The curriculum is your course in written form. This is where you organize your thoughts, knowledge, and expertise on the page. You need to ensure that you have the proper information order, logical sections, enough lessons, etc. Your curriculum should tell the story of the course. Make sure that you aren’t presenting and talking about information that you haven’t setup or explained to the students.
When writing my curriculum documents, I like to use a bullet list and write out all of the main ideas/sections/lessons that I want to have and visualize them. I think of the information I want to present in each and think through the logical order that they need to be in to make sense. Remember, we need to set our students up for success!
The curriculum will most likely be your second longest task, or your longest task if you aren’t managing the filming aspect yourself. Our Quit Wasting Time curriculum took over 17 hours, or 27% of the total project, to write from start to finish over multiple weeks. This doesn’t include the background research that was completed and all of the other work that goes into curating the information to put into the curriculum.
Remember, this is the curriculum DRAFT. Do not let yourself get stuck on having it final and completed! There will be changes and modifications in the next sub-step. Up until filming, and even after, you can still add or remove things to your curriculum. So get enough done to where you feel comfortable and confident with moving forward. Each step will take time, especially the end user research. So get the next steps started and wrap your final curriculum up after.
End User Research
Once the curriculum draft is completed, or ready enough, it’s best to perform some end user research to gain feedback on the curriculum and the proposed content. You want to get this into the hands of people who represent your targeted audience. Use your friends, family, followers, network, or whoever else you need. The goal is to make sure that you have a solid curriculum that doesn’t have any glaring mistakes and that it will ultimately make sense and translate to the students. Try to get some other professionals in the topic field to review for accuracy. Try to get some people who would be interested in learning the topic. Take both perspectives back to the draft and update it. You should gain some valuable advise during this research time! If you come back with no feedback, you didn’t do it right.
Some other things we ask our end users to tell us about can be:
- Structure Errors (Course sections/Lesson Structure)
- Information Errors
- Spelling/Grammar
- Personal Suggestions & Feedback
- An Overall Course Rating
Maven Edu has created a custom AirTable Base to track all of these responses. AirTable is a great tool but it’s not the only one. If you want to sit with someone in person and write down the responses, it doesn’t matter as long as you get the feedback. We have a form that the respondents will fill out and complete. Once completed it records the responses and give us an actionable list of things to correct, add, or remove categorized by suggestions or complaints. I think it’s important that if you are going to be writing more courses in the future, that you take note of these so that you don’t make the same mistakes in the future. Having them documented gives you a checklist in the future of other things to check and validate before moving forward.

So take the time and put the effort into the user research section of the process to gain some valuable feedback that will make your course better!
End User Research
Once the curriculum draft is completed, or ready enough, it’s best to perform some end user research to gain feedback on the curriculum and the proposed content. You want to get this into the hands of people who represent your targeted audience. Use your friends, family, followers, network, or whoever else you need. The goal is to make sure that you have a solid curriculum that doesn’t have any glaring mistakes and that it will ultimately make sense and translate to the students. Try to get some other professionals in the topic field to review for accuracy. Try to get some people who would be interested in learning the topic. Take both perspectives back to the draft and update it. You should gain some valuable advise during this research time! If you come back with no feedback, you didn’t do it right.
Some other things we ask our end users to tell us about can be:
- Structure Errors (Course sections/Lesson Structure)
- Information Errors
- Spelling/Grammar
- Personal Suggestions & Feedback
- An Overall Course Rating
Maven Edu has created a custom AirTable Base to track all of these responses. AirTable is a great tool but it’s not the only one. If you want to sit with someone in person and write down the responses, it doesn’t matter as long as you get the feedback. We have a form that the respondents will fill out and complete. Once completed it records the responses and give us an actionable list of things to correct, add, or remove categorized by suggestions or complaints. I think it’s important that if you are going to be writing more courses in the future, that you take note of these so that you don’t make the same mistakes in the future. Having them documented gives you a checklist in the future of other things to check and validate before moving forward.
So take the time and put the effort into the user research section of the process to gain some valuable feedback that will make your course better!
6. Script Development
We are over halfway done! Your course is already coming along and you’re on the ending sprint! Next up we have the script development. This step is entirely optional, however I would recommend it. The script allows you to think though and document all the physical and digital assets that will go into the filming or recording of the course. This helps you ensure that you don’t miss something important or critical while filming the course, ensures you have good continuity in the lessons, and will help you to edit the course later (or tell the editor what you want).
Both during and following the filming you will have a lot of moving parts, a lot of files, and a lot of information. The script is the master guide to tie it all together. Some instructors like to have most of their spoken parts in so that they can create some teleprompter cards, while some prefer bullet points of things to talk about. NOW, some of this can be a little more detailed than required. For me, going through this process helped me to come up with new ideas and to ensure that the filming process was quick, accurate, and easy as ever.

7. Course Styling & Graphic Design
Now this section you might not be completing yourself, but it’s a step that needs to be done. If you are contracting out this design work, you need to be able to communicate what you want and what you are looking for to a designer. The styling of the course should be unique to you and convey the marketing look and feel you want to portray to your students. It’s important, however, that the designs don’t detract away from the material through distractions. The design should compliment the course, the instructor, and the overall content.
Try to think through all of the video/visual elements you need to have on hand for editing, or that you need to provide to an editor for editing. Some common elements include:
- Main Course Graphic
- Title/Out Sequences
- Lower-Thirds
- Split View Lists
- Overlay Graphics
- Cut Away Graphics
- Custom Transitions
- Animations
For some examples of this design, check out any of the Maven Edu courses to see our end designs!
8. Film & Edit the Course
This is one of the most exciting and exhilarating parts of the process (apart from launching in step 11). But the filming and recording of the course is where it all comes together and is solidified into media! The whole process from setting up, to filming, to tearing down is stressful and so much fun at the same time. This process will vary for each person, each course, and depending on if you are filming yourself or with an external person/company
Filming
During filming, utilize your script and curriculum. Have both physically handy to double check things and add or remove as necessary. Use the physical papers to take notes of any changes to make sure they are addressed in editing. It’s critical to remain flexible during filming as what it looked like in your head might not be how it’s looking in the moment. If there needs to be changes, make them. Just be hyper vigilant as to how it might affect other aspects of the course, curriculum, script, previously recorded lessons, or the editing process.

Editing
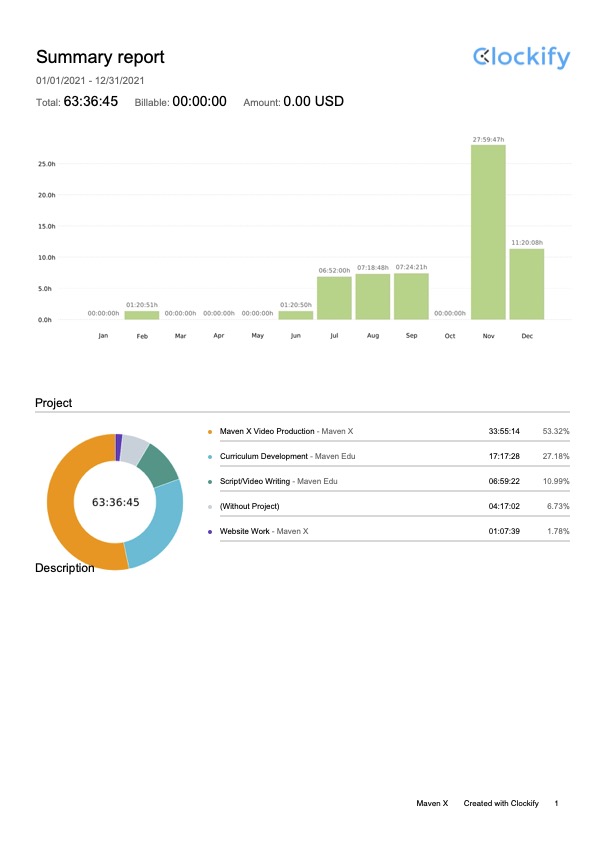
Now’s where it all comes together! The editing process will take a while and be very tedious. The filming/editing process from start to finish will take time. As seen in the Clockify report image above, we can see that the Video Production process took over 33 hours to complete, or 52% of the time. This included a lot of trial and error with the editing and filming processes but it’s worth the time and investment!
The one advice that we can give you during this step is to enjoy it. Enjoy the process and enjoy seeing your vision come to a physical fruition!
9. Upload to Learning Management System (LMS)
Now we are ready to start uploading our course and making it look presentable to our students. This step can be probably one of the most tedious ones (I know I’ve said that before). But this step involves uploading all the videos, graphics, writing descriptions, adding resources, making sure that access to external resources is working, and that everything… I mean EVERYTHING is working and looking perfect. Remember the curriculum document? That should be used to help fill out this information! Remember in the Maven Edu template, we have a section called LMS Information that our instructors fill out. All information on the main course page is in that document.
The front end of the course page (where students will be making a purchase) should be tied heavily to your marketing plans and be worded as such. This is where you are selling your course! You want to make it enticing to your potential students and sell them on your credibility and the content itself.


In the back end, ensure that you have all course sections/lessons, course descriptions, quizzes/tests, and other information filled in correctly. Last thing to do is a final run through of the course in the LMS from the student’s perspective to make sure that you didn’t miss anything and that things are running smoothly!
10. Final End User Research
The next step is to do another end user research session. This time we want to have our user researchers review the videos, the editing, the descriptions spelling, and the overall presentation of the course from a student perspective. This will be extremely valuable, especially if you are building a custom platform/website to host the site. Your researchers can let you know about any glitches, tech issues, latency issues, all across multiple different internet providers, devices (mobile, tablet, desktop), and browsers.
In order to ensure that our researchers are looking for the right things and not looking at the wrong things, we created a feedback guide (See below). This is a beautiful document to both thank the researcher and also provide very specific and detailed instructions. If you want to receive specific and directed feedback you need to communicate and be as specific as possible to your researchers.
Once again, Maven Edu utilizes AirTable to capture responses. We once again send them the Course Evaluation form to see if their responses improved or if they weren’t apart of the curriculum review. We then use a Video Feedback form to get more details on the quality they were experiencing as this is crucially important to Maven Edu.

Make any final changes to the course, website, or LMS and then move to the final step, step 11!
11. Launch and Ongoing Marketing
The time has finally come to launch your course! Build up the hype for the course through your marketing channels, tell all your friends and family and continue to share your course to drive sales. You’ve worked incredibly hard over the previous 10 steps. So take a step back and give yourself some credit. You actually took the steps and put the work into creating an online course!?
Final Thoughts.
Designing and creating an online course is a long and tedious process to make it valuable and hopefully successful. But it can be one of the best experiences ever! Regardless of what happens, you should have learned a lot through the experience. You will learn what you will want to do differently or better the next time, you know what not to do next time, you have a start to finish created course, and you most likely learned more about the topic yourself through the curriculum writing process.
There are tons of benefits and rewards to building an online course. We hope that this ultimate guide gave you the right tools and information to get started and create your course! Now take these 11 steps and get started!

Join Our Mailing List
Your inbox is important to us. Maven X will only send you a once a month recap of all things going on with Maven X including: newest blog posts, promotions, news, and other helpful resources!
Latest Instagram Posts


